

Reconciliation Step (Turbo AI processes)
The Reconciliation step in Turbo AI processes creates a transaction reconciliation analysis based on the data prepared in the process. This is the reconciliation used in Turbo AI processes. The configuration has been simplified and is supported by artificial intelligence in defining the rules, reducing manual effort and configuration errors. Once configured, the step generates an analysis to run and review on the new reconciliation screen, where you investigate, adjust, and validate the results.
Which reconciliation is this: this article covers reconciliation for Turbo AI processes, with the support of artificial intelligence (Turbo AI). Standard processes use the "Reconciliation Step (Standard processes)," which exports the data for analysis on the traditional screen. Both remain active.
Before you start
Reconciliation is the output of a data preparation flow. Before configuring the step, complete the preparation of the sources that will be included in the analysis. You will also decide which source is Side A (the main reference source) and which is Side B (the source compared with Side A). The two sources are compared during the analysis.
Step configuration
Add the step: once the preparation flow is complete, add the Reconciliation step to the process.
Connect the sources: link the data sources that will be part of the reconciliation and define which is Side A and which is Side B.
Open the configuration: double-click the Reconciliation step to access the Reconciliation Configuration screen.
Fill in the fields and click Save to complete the initial configuration.
The initial configuration fields are:
Name (required): identifies the reconciliation step. It can be edited and defined by you.
Code (required): unique code identifying the reconciliation. Once saved, it cannot be changed.
Side A: description identifying the source defined as Side A.
Side B: description identifying the source defined as Side B.
Identify relationship
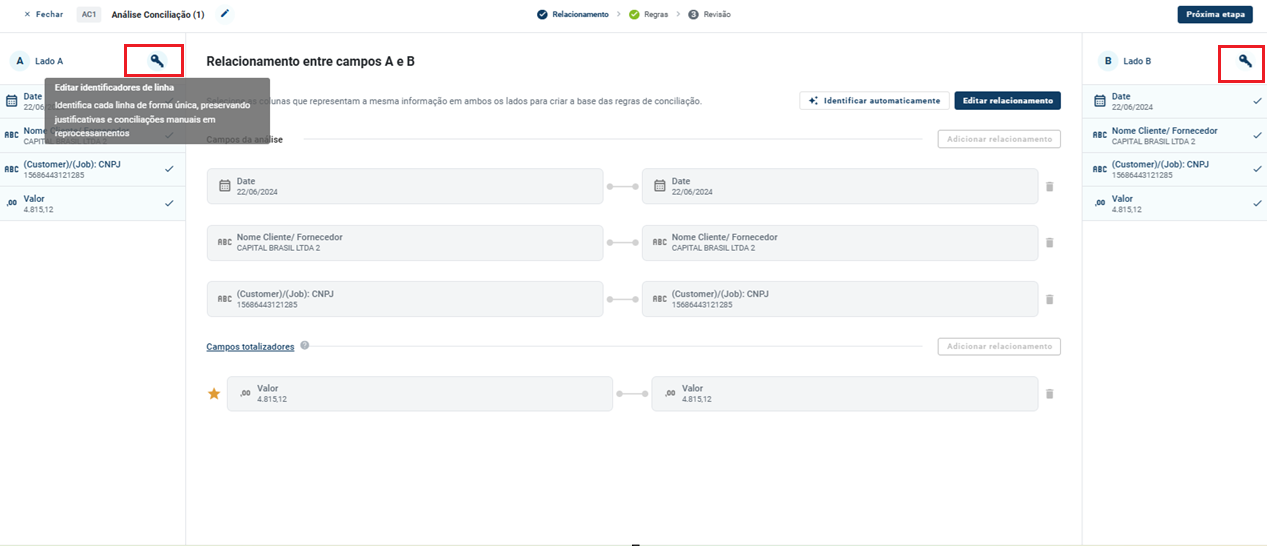
At this stage, the platform identifies how Side A records relate to Side B records. These relationships are the basis for creating reconciliation rules. Choose one of the options:
Automatic identification: Dattos artificial intelligence analyzes the Side A and Side B data and automatically identifies the corresponding fields between the two sources. You can then edit or add relationships.
Manual registration: you define the Side A field and the corresponding Side B field. Manual relationships complement or replace those identified automatically.
Two types of fields organize the analysis:
Analysis fields: used in the analysis to create comparison rules.
Total fields: numeric fields, such as monetary amounts or quantities, that can be added up and used in the reconciliation.
Totals in the analysis: when you highlight a relationship, the field total is displayed in the filters, quantitative indicators, and dashboards of the transaction reconciliation analysis.
To proceed to the next step, at least one relationship must be defined for analysis fields. Total fields are optional: without them, the reconciliation checks whether records exist on both sides without calculating an amount difference. If the types of related fields differ between the sides (for example, a date on one side and an alphanumeric field on the other), the platform indicates that you must adjust the field types before proceeding. When the configuration is correct, the Next step button is enabled.
Row identifiers
On the Relationship and Rules screen, you can define row identifiers:
Click the row identification icon.
Select the fields that uniquely identify each record.
Row identifiers allow you to update data in new runs without deleting the analysis history, ensuring continuity and traceability of the information. To understand how the platform behaves with and without a row identifier, see the article "Import types."
Reconciliation rules
Based on the configured relationships, Dattos artificial intelligence analyzes the data and generates matching rules. After they are generated, you can:
Accept the suggestions and proceed to the next step.
Adjust the rule settings as needed for the process.
Create additional rules when necessary.
Two actions are available at this stage:
Reprocess: enabled whenever a rule is changed or the order of the rules is modified. Reapplies the configured rules according to the changes.
Rediscover rules: has the platform analyze the data again and generate a new set of rules.
Rediscovering rules discards manual adjustments: when confirmed, all manual changes to the rules (additions or edits) are discarded, and the rules are recreated automatically.
When the configuration is correct, the Next step button is enabled.
Rule type
Every rule has a Type, selected from a list at the top of the rule configuration. The type indicates what the rule does with the records and which side they come from:
Type | What it is used for |
|---|---|
Reconciliation A x B | For each Side A entry, finds the corresponding entry on Side B. This is the default and most commonly used type. |
Offsetting A x A or Offsetting B x B | Offsets entries within the same side: amounts with opposite signs that cancel each other out, such as an entry and its reversal. |
Classification A or Classification B | Separates and identifies a set of records on one side, without comparing it with the other side or adding up amounts. |
The information icon (i) next to the Type field displays these definitions at any time.
The type cannot be changed later: as soon as you add the first field or filter, the type is locked, including after saving. If you selected the wrong type, delete the rule and create another one.
Classification rules: separating records within the same side
Use classification when you need to mark records on one side based on a condition in your data, without comparing amounts with the other side. For example:
Exclude items that should not be charged: mark installments starting with the second one (installment greater than 1) in a commission source, so they appear labeled in the result instead of as pending items.
Separate a category: label entries as fees or internal adjustments so they appear identified in the result.
How to configure:
Click Add rule and, in the Type field, choose Classification A or Classification B.
Create the conditional filter, which is required: it defines which records the rule selects. A classification rule has a single filter on the selected side.
If you want, add fields under Group the result by. Without fields, all selected records appear together as a single record in the result. With fields, one record appears per group, with the group total—for example, one record per operator.
Under Reconciliation result, choose Reconciled to mark the set as resolved, or Partially reconciled to leave it flagged for analysis.
Click Save.
In a classification rule, cardinality does not apply, and amount and offsetting fields do not appear. In the list of rules, it is marked Classification next to the name. The rule follows the order of the other rules: the records it selects no longer participate in subsequent rules. During review, the total appears only on the classified side; the other side and the difference remain empty because no comparison was performed.
Rule always created by you: artificial intelligence does not suggest classification rules. They are created manually. Classification marks everything selected by the filter; it does not search for duplicate records on its own.
Reconciliation without a total field
When the reconciliation has no total field, the Amount and Offsetting columns do not appear in the rule field table, and every one-sided rule must be a classification rule. If you choose an offsetting type, when you save, the platform displays: "This reconciliation has no amount column. Use the Classification type or go back to the Relationship step to add one."
When the rule cannot be saved
When you click Save, the platform checks the rule and indicates what is missing, one item at a time:
Classification rule without a filter: configure a conditional filter.
Reconciliation or offsetting rule without fields: add at least one field.
Offsetting rule without an amount field: for a numeric field, turn on Amount and then Offsetting. Deselecting the last amount field does not turn the rule into a classification rule; it remains an offsetting rule and cannot be saved until it has the field.
Analysis review
The result of applying the rules appears on the review screen, where you validate the settings before completing the analysis. The platform displays, in a single table, the records that will be automatically reconciled according to the defined rules.
Filters and display. You can filter the data in two ways: directly through the table or through the left side panel, using reconciliation statuses.
Show analysis columns only. When this option is enabled, the Matching ID, Status, Rule, Structure, and A and B Rows fields are hidden. Only the analysis data remains visible, making it easier to read and validate.
View details. When you click View details, you can view the complete data for the Side A and Side B records and identify which key rule fields were used to reconcile the records.
Edit columns. With this option, you can customize the analysis display:
Reorder the displayed columns.
Change the data display type, choosing between grouping Side A and Side B data in a single column (when the records are reconciled) or displaying them side by side in separate columns (even when reconciled).
Add an amount difference column, showing the difference between the Side A and Side B amounts.
Single side, to display only the Side A columns or only the Side B columns.
When everything is correct, click Finish to complete the analysis configuration and proceed with the run.
Related articles
Reconciliation Step (Standard processes)
Import types