

Integrating with file repositories: source and output directories
A file repository is where your company’s systems store files: an SFTP or FTP server, an Amazon S3 bucket, an Azure Blob Storage container, or a Google Cloud Storage bucket. By connecting a repository to a process, you no longer have to upload and download files manually:
the Source Directory specifies which repository folder the automatic run retrieves files from for each data source;
the Output Directory specifies which repository folder the process delivers files generated by export steps to.
Both screens are in the process settings and are available only in Turbo AI processes.
Before you begin
Integration comes at the end of setting up a process, not at the beginning. It doesn’t help you build the workflow: it only starts working after the workflow is complete and published.
Set up the repository connection under Settings › General › Credentials. See File repositories: which ones Dattos connects to and how to set them up.
Build the entire workflow using a sample file you already have. Each file source step needs a sample uploaded from your computer to define columns and data types. Integration can’t be used to bring in this sample: you can’t build the source from a file that is only in the repository.
Publish the workflow. The Source Directory and Output Directory rows are generated from the published version. Until the workflow is published, the screens appear empty or don’t show the new steps.
Create an automation rule for the process (scheduled, trigger-based, or API-call-based). This is what makes the platform go to the repository and retrieve the files.
Three rules that apply to the Source Directory
Workflow first, integration second. Without a published workflow, there’s no source to connect to a folder. Integration also doesn’t replace the sample file required to build the workflow.
The platform doesn’t show what’s in the folder. When configuring, you select folders, never files, and you can’t open or preview files in the repository. To check their contents, use the repository’s own tools.
Only automatic runs retrieve files. If you run the process manually, the platform uses only the files you upload on the screen and ignores the repository.
Manual runs don’t use the repository. To test the integration, trigger the automation rule. A successful manual run doesn’t prove that file retrieval from the repository is working.
Source Directory: where files come from
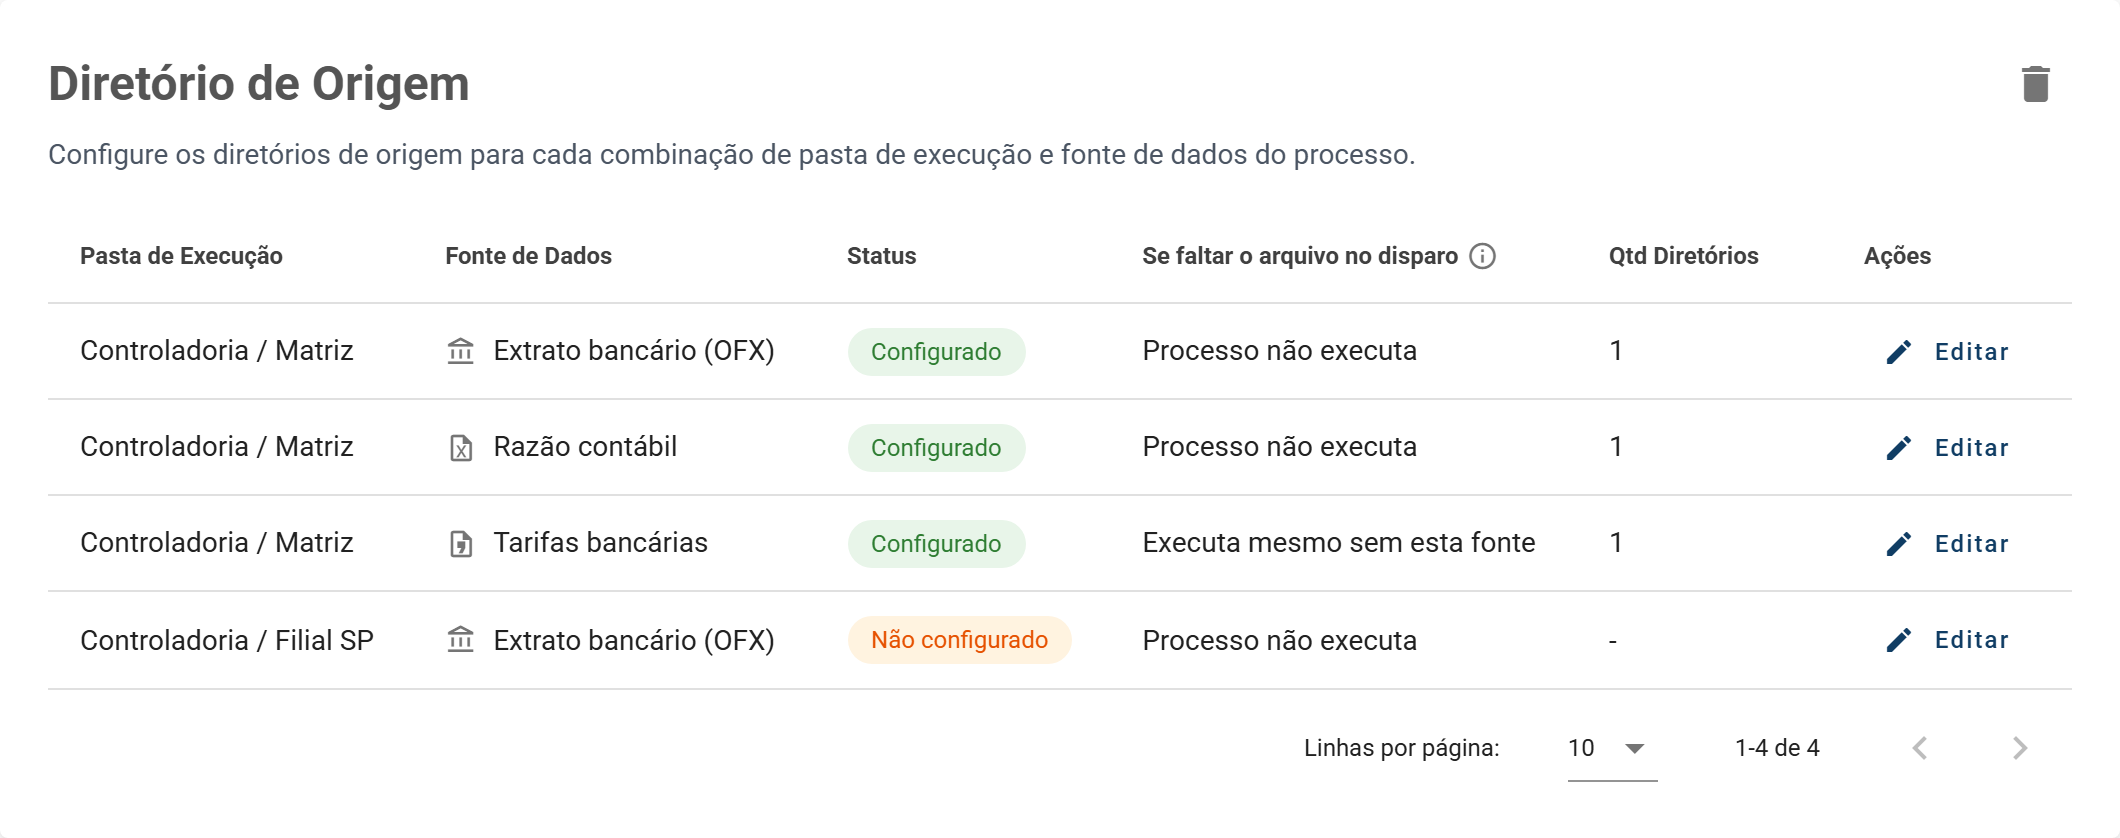
Each row is a combination of a run folder and a file data source in the published workflow (Excel, text, OFX, PDF, XML, JSON, and similar formats). Non-file sources, such as APIs, databases, or ERPs, don’t appear here.
Configure a source
In the process settings, open Source Directory.
In the row for the run folder and source, click Edit (pencil icon).
Click Add destination.
Under Storage Integration, select the repository you set up. The … button next to it opens the credential settings in another tab.
Under Import Folders, select one or more repository folders.
Choose what happens if the file is missing when the rule is triggered (see the section below).
Click Save. The row will show Configured.
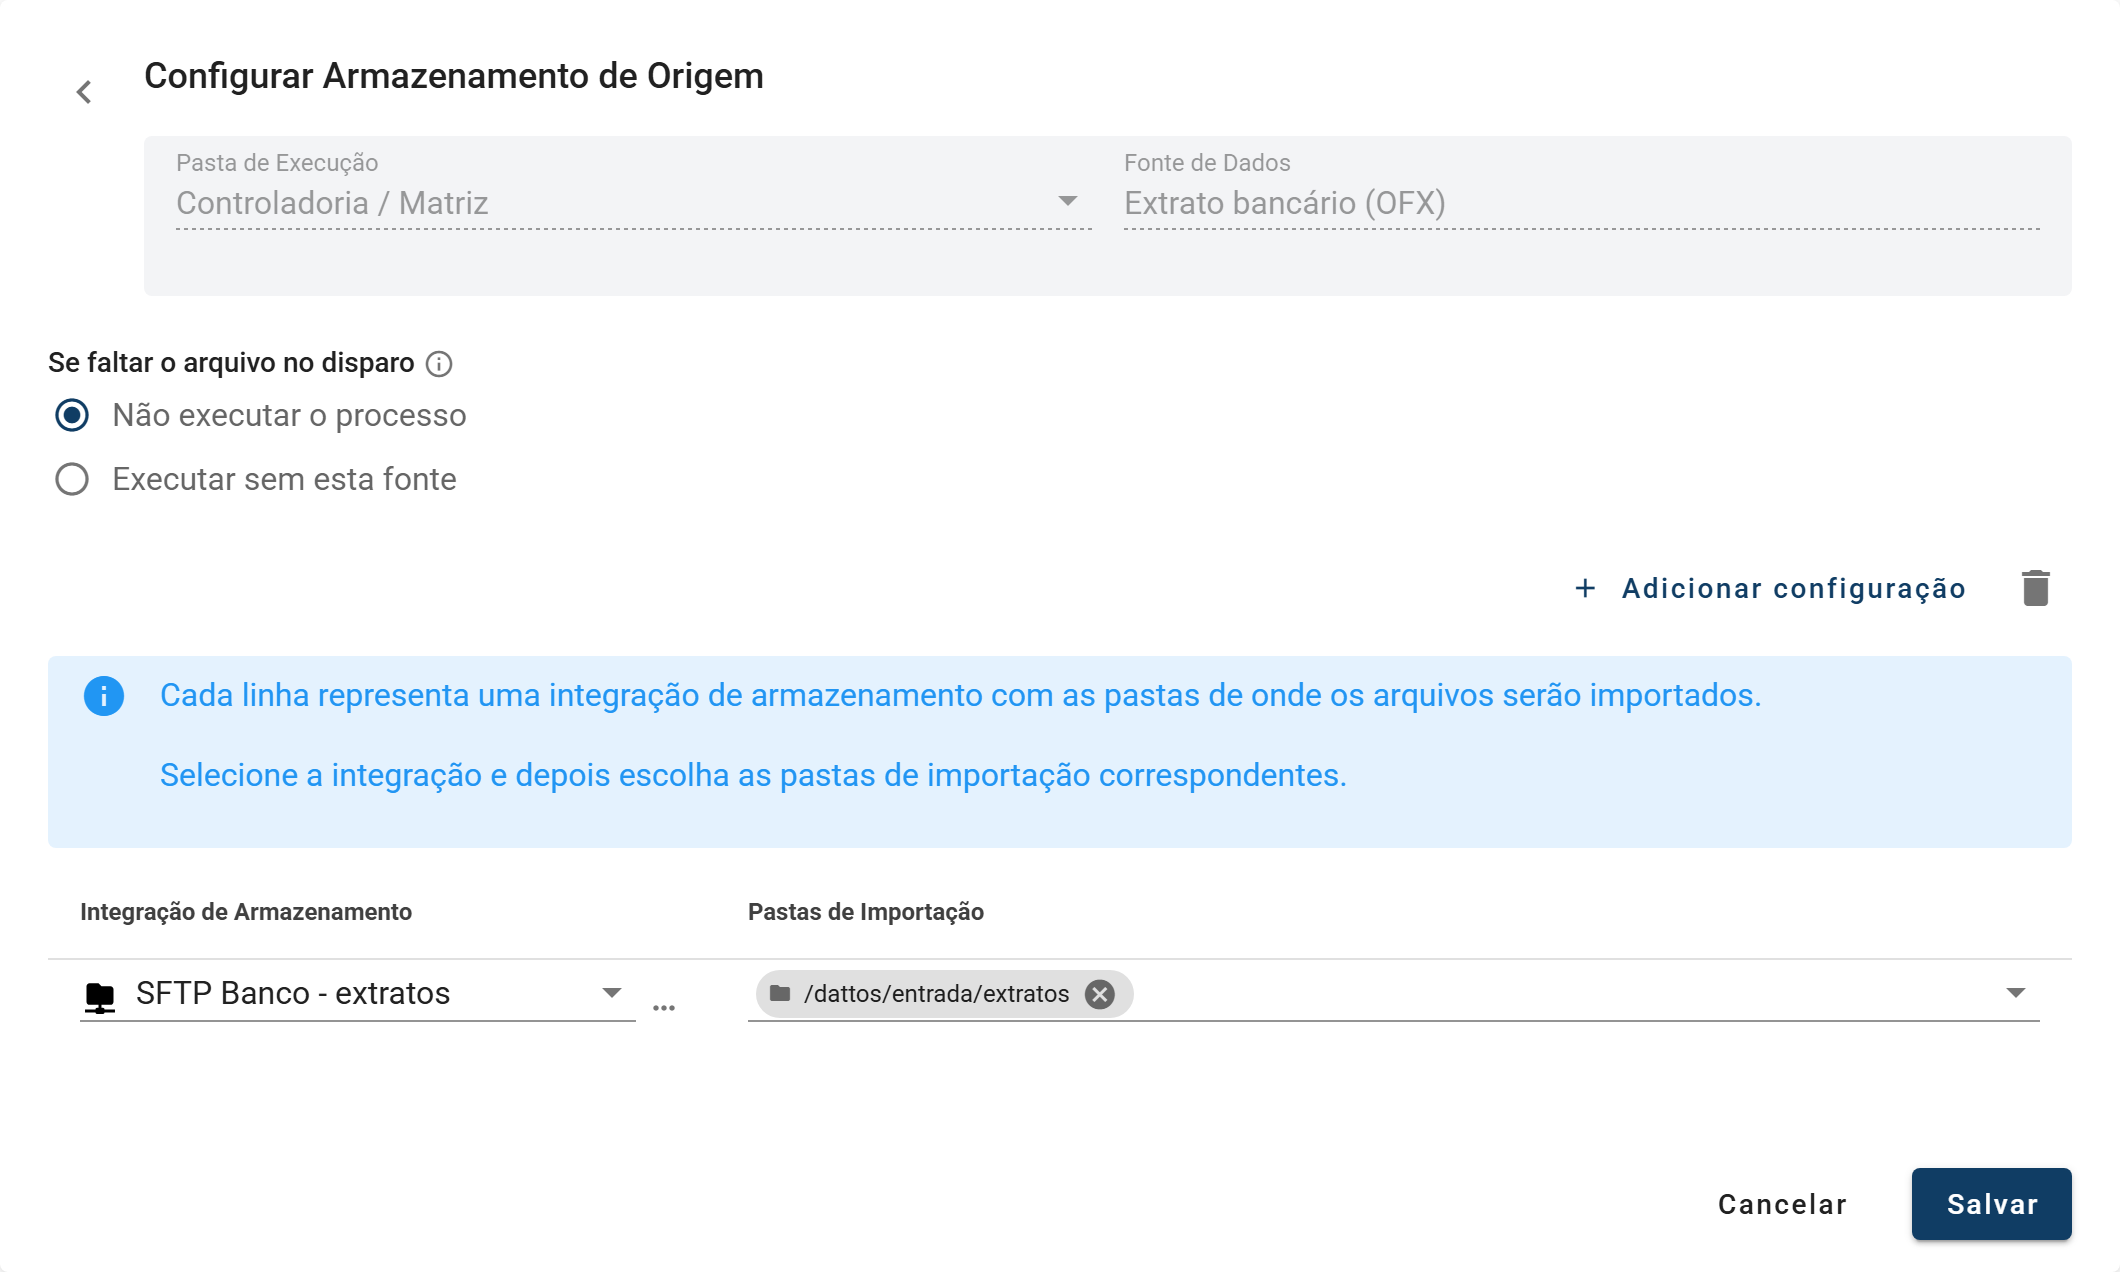
A source can retrieve files from more than one repository (one destination for each) and from multiple folders in each repository.
Which files the automation retrieves
All files in the selected folder are included in the run. There’s no filter by name or extension. If the folder contains three files, all three are loaded into the same source. Use a separate folder for each source.
The folder determines the source, not the file contents. The workflow’s File Identification Rules apply only to manual uploads on the upload screen. When retrieving files from the repository, every file in the folder goes to the source connected to it.
Only files directly in the folder are read. Subfolders aren’t read. If your files are in subfolders, select each subfolder under Import Folders.
The contents must match the file extension. For example, a text file renamed with the
.xlsxextension is rejected, and the run for that folder ends with an error.
What happens to files in the repository
The platform moves the files it reads to subfolders created inside the source folder:
Subfolder | When the file is moved there |
|---|---|
| While the run reads the file |
| When the run for the folder finishes successfully |
| When the run for the folder ends with an error. All files from that run are moved here, including files that hadn’t been read yet |
In practice:
the source folder is empty after each run, ready to receive the next file;
to run a file again after an error, fix the cause and move the file from
.errorback to the source folder;these subfolders don’t appear in the platform’s folder list, so they can’t be selected by mistake;
if another system at your company also reads that folder, it won’t find the file after Dattos processes it.
If the file is missing when the rule is triggered
For each source, choose what the automatic run does when it doesn’t find a file in the folder:
Don’t run the process (default): the process isn’t run for that run folder. Data already processed for the reference date is preserved.
Run without this source: the process runs as usual, without the missing source.
Your choice appears in the If file is missing when rule is triggered column: Process won’t run or Run without this source.
Why the default is not to run: in an automatic run that replaces data for a date, an empty folder would make the process recalculate the date without that source and erase data that had already been reconciled.
This safeguard applies only when all three conditions are met:
the source is a file source;
the run is automatic and triggered by an automation rule;
the import mode is Replace.
The Update mode isn’t blocked because it adds data instead of recalculating the date.
For the safeguard, any file in the folder when the rule is triggered counts, even if it’s not new. It prevents the folder from being empty, but doesn’t identify an outdated file.
When the process isn’t run
The reference date appears in Import Management with the Not run status, and the reason indicates which source was missing a file. In this case, no files are moved: put the missing file in the folder and wait for the next trigger.
Tip: The Not run status also appears when a run is blocked by the approval workflow. Check the reason to find out which of these two situations occurred.
When the reference date comes from the file
Since version 16.6, a file source can use Reference Date in Source: you specify a date column, and each distinct date in the file creates a separate load. With a repository, this changes two things:
The automation rule’s date no longer applies. The rule still follows its schedule, but the dates processed are those in the file, not the date calculated by the rule’s calendar. For an API call, don’t provide a reference date: the platform rejects the call.
One file can update multiple dates at once. Just put a file containing the entire period in the folder.
Output Directory: where exported files go
Each row is a combination of a run folder and an export step that generates a file in the published workflow: Excel Export, Text File Export, and Document Export. Database Export writes directly to a table and doesn’t appear on this screen.
Without an Output Directory configured, the file remains available for download in the run’s exports panel. With an Output Directory, the file is also saved to the repository.
Configure an export destination
In the process settings, open Output Directory.
In the row for the run folder and export step, click Edit.
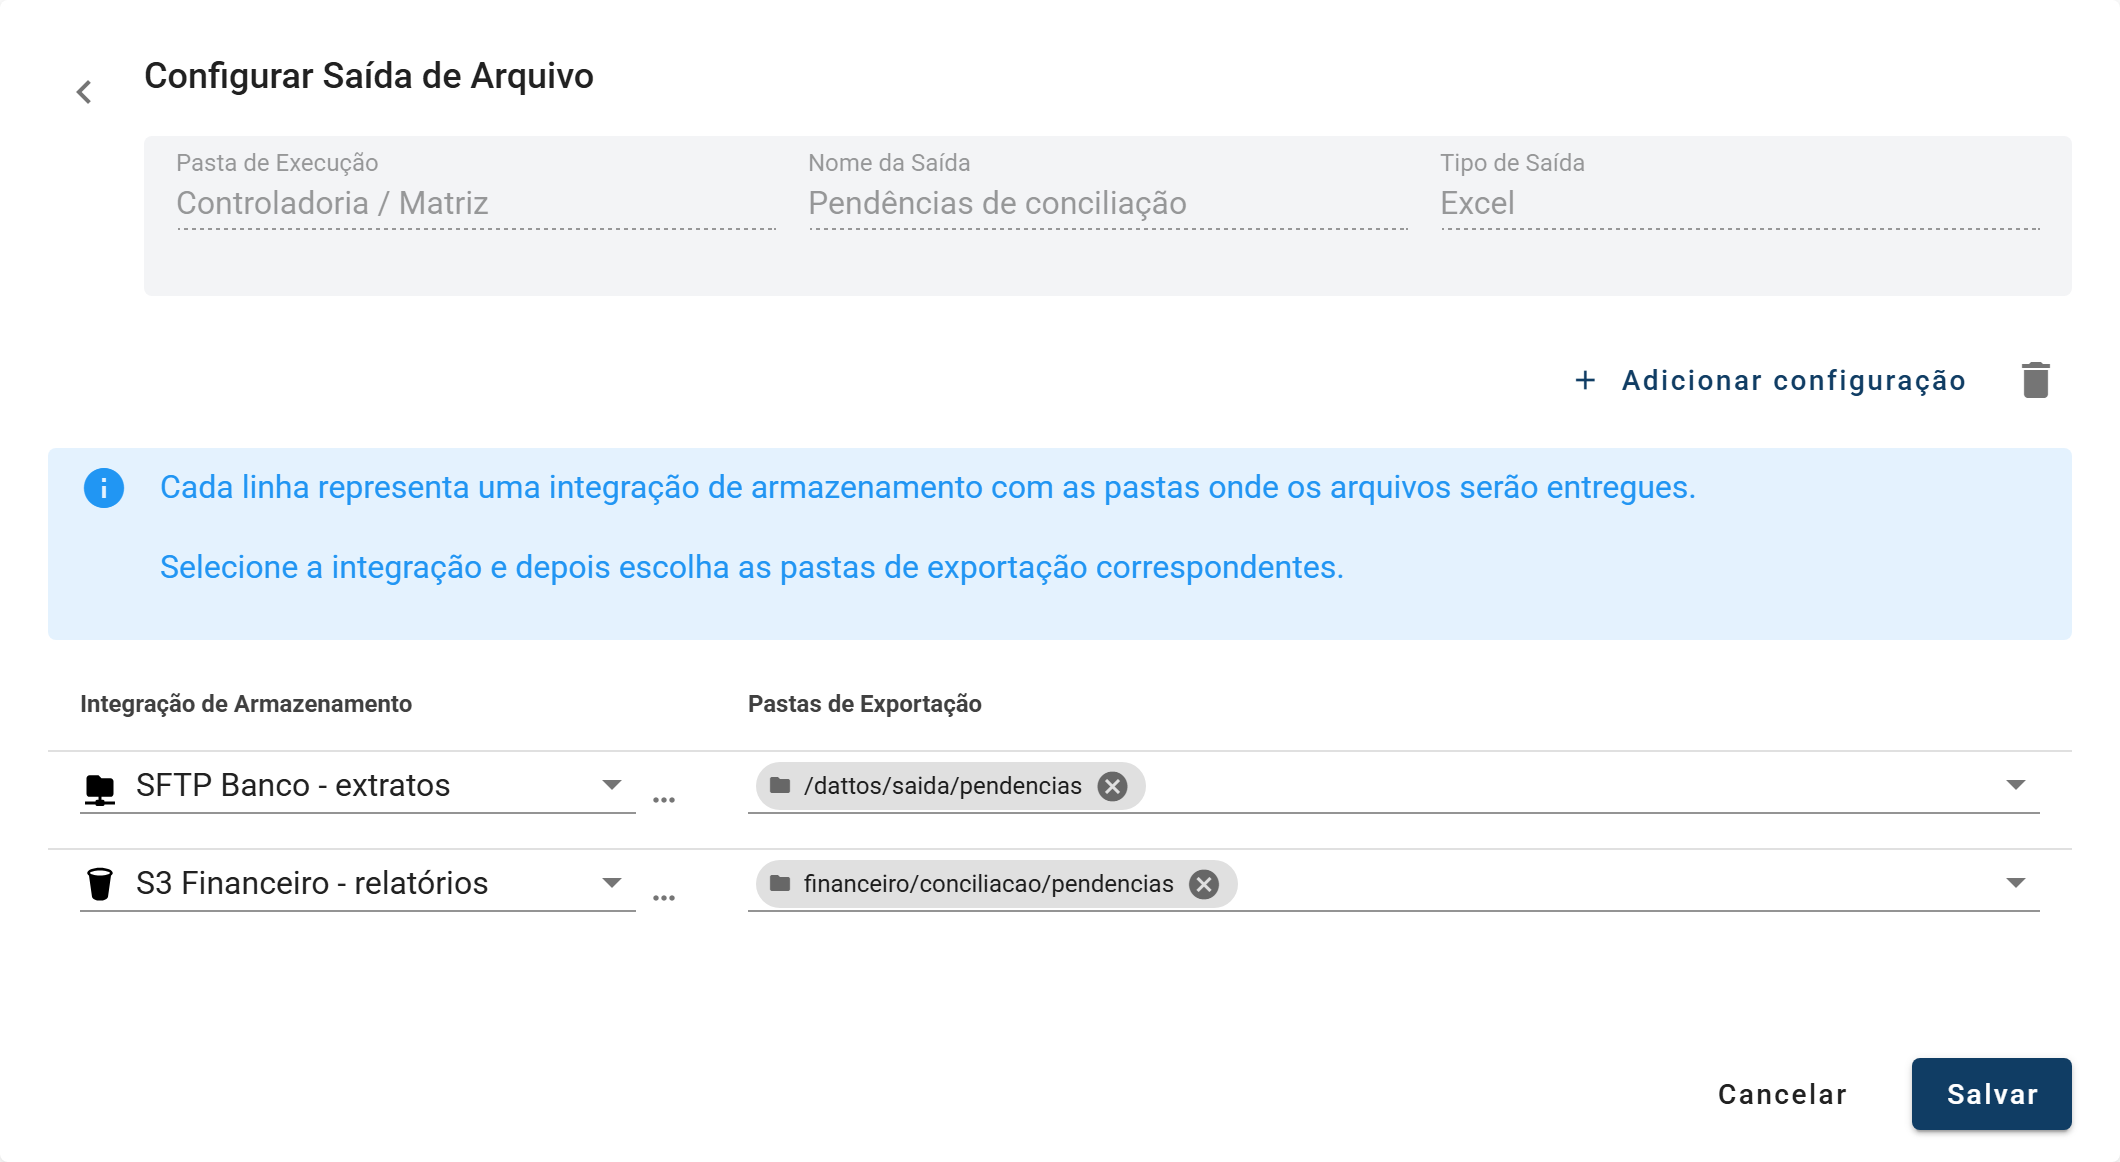
Click Add destination.
Under Storage Integration, select the repository.
Under Export Folders, select one or more folders.
Click Save.
If you configure more than one destination, the same file is saved to all of them. For example, this is useful if you need to keep one copy in your company’s bucket and another on a partner’s SFTP server.
How the file is delivered to the repository
The export step determines the file name using the File Name Pattern field. If two files have the same name, the new one replaces the previous file in the folder. To keep a history, use variables such as
{referenceDate:yyyyMMdd}or{timestamp}in the name pattern.The file is delivered each time the export step runs, whether the run is manual or automatic.
With Reference Date in Source, each date generates its own output file. If the name pattern doesn’t include
{referenceDate}, each date’s file replaces the one from the previous date, and only the latest file remains in the folder.If saving to the repository fails, the export step ends with an error, and the message appears in the run log.
Things to watch out for
Configure the source for every file source. For a process with automatic runs, it’s best practice to configure a Source Directory for every file source in the workflow so that each run includes all the data.
Renaming a step breaks the connection. The configuration is tied to the step’s name and type. If you rename the source or export step in the workflow and publish it, the old row will show Data source not found (source) or Step not found (output), and the step with the new name will appear as Not configured. Configure the new row.
Folders renamed or deleted in the repository. When you open the editor, the platform notifies you if a folder saved in the configuration no longer exists in the repository. Select the new folder and save.
Repository unavailable. If the credential is deactivated or deleted, or your privacy profile doesn’t have access to it, the editor shows Integration unavailable: credential deleted, inactive, or inaccessible.
New folder in the repository. The folder list is retrieved from the repository when you open the editor, and it may take a few moments for a newly created folder to appear. Close and reopen the editor.
Two runs at the same time for the same run folder and reference date can’t run simultaneously: the second run ends with a simultaneous execution error.
Pending manual upload with the same name. If a file has been uploaded manually but not yet processed, and it has the same name as a file found in the repository, the automation discards the manual upload and uses the file from the repository.
Common issues
What you see | What to do |
|---|---|
The directory screen is empty | Publish the workflow. If it’s already published, check whether it has a file source (Source Directory) or an export step that generates a file (Output Directory). |
The repository doesn’t appear under Storage Integration | Check that the credential is active and that your privacy profile has access to it in the credential settings. |
Error loading folders | The access details are incorrect, or the repository doesn’t accept the connection. Review the credential using the tutorial for your repository type. |
I ran the process manually, but it didn’t retrieve the file from the repository | This is expected: only automatic runs retrieve files. For a manual run, upload the file on the screen. |
The file disappeared from the folder | Look in the |
Not run status | Check the reason in Import Management: the file is missing from the folder, or the approval workflow blocked the run. |